


App Review
Design - 8.8
Speed - 8.7
Features - 8.3
Look & Feel - 9
Value for Download/Money - 8
8.6
Great!
With its robust encryption protocols and strict no-logs policy, Surfshark VPN ensures that your online activities remain private and protected from prying eyes.
In between 2019 and 2023, the use of virtual networks, particularly VPNs, has seen a significant surge. People are increasingly concerned about their online privacy and security, seeking reliable solutions to protect themselves from hackers, data breaches, and intrusive surveillance.
In this highly detailed review, we will delve into Surfshark VPN, a highly regarded VPN service that offers robust protection, anonymity, and a host of advanced features. Join me as we explore how to download, use, and harness the full potential of Surfshark VPN on Android.
Understanding the Need for a VPN
A Virtual Private Network (VPN) is a powerful tool that enhances your online security and privacy by creating a secure and encrypted connection between your device and the internet. In an age where privacy concerns and cyber threats are on the rise, understanding how a VPN works and why it is essential is crucial.
A VPN shields your data from hackers, government surveillance, and even your own Internet Service Provider (ISP) by routing your internet traffic through a secure tunnel and masking your IP address. It encrypts your data, making it unreadable to anyone attempting to intercept it.
 By using a VPN, you can browse the internet anonymously, access geo-restricted content, and protect your sensitive information, particularly when using public Wi-Fi networks.
Surfshark VPN is a leading provider in this space, offering advanced security features, a wide server network, and user-friendly interface to ensure that your online activities remain private and secure.
In the following sections, we will delve into the step-by-step process of downloading, installing, and utilizing Surfshark VPN, as well as exploring its extensive features and benefits in detail.
Exploring the Importance of Privacy and Security in the Digital Age
In today’s digital landscape, privacy and security have become paramount concerns. With the increasing prevalence of cyber threats, data breaches, and online surveillance, safeguarding our personal information and online activities has become crucial.
Hackers, governments, and even ISPs (Internet Service Providers) can monitor our online behavior, track our movements, and collect sensitive data without our knowledge or consent. This is where a Virtual Private Network (VPN) comes into play.
Why VPNs are Essential for Protecting Your Online Activities
A VPN creates a secure and encrypted connection between your device and the internet, effectively shielding your data from prying eyes. By routing your internet traffic through an encrypted tunnel and masking your IP address, a VPN provides anonymity and ensures that your online activities remain private. It encrypts your data, making it unreadable to anyone who might intercept it, including hackers and government agencies.
VPNs are especially valuable when using public Wi-Fi networks, which are notorious for their security vulnerabilities. Whether you’re working remotely from a coffee shop or accessing sensitive information on the go, a VPN safeguards your data from potential hackers lurking on the same network.

Introduction to Surfshark VPN and its Key Benefits
Surfshark VPN is a leading VPN service provider known for its advanced security features, extensive server network, and user-friendly interface. It offers a wide range of benefits to users seeking to enhance their privacy and security online.
With Surfshark VPN, you can enjoy:
- Strong encryption: Surfshark uses industry-leading encryption protocols, such as OpenVPN and IKEv2, to ensure that your data remains secure and protected.
- No-logs policy: Surfshark has a strict no-logs policy, meaning that it does not store any information about your online activities, ensuring your privacy is maintained.
- Wide server network: Surfshark boasts an extensive network of servers located in various countries around the world. This allows you to bypass geo-restrictions and access content from different regions.
- Unlimited device connections: Unlike some VPN providers, Surfshark allows you to connect an unlimited number of devices simultaneously under one subscription, making it convenient for individuals and families.
- Ad-blocking and malware protection: Surfshark’s CleanWeb feature blocks ads, trackers, and malware-infected websites, providing an additional layer of security and improving your browsing experience.
By using Surfshark VPN, you can take control of your online privacy, protect your sensitive data, and enjoy unrestricted access to the internet without worrying about prying eyes or potential cyber threats.
Next, we will explore how to download and install Surfshark VPN on your Android device, enabling you to harness its extensive features and maximize your online security and privacy.
Downloading and Installing Surfshark VPN
Firstly, Surfshark VPN ensures your privacy and security by encrypting your internet traffic, making it virtually impossible for anyone to intercept or monitor your online activities.
This is particularly crucial when connecting to public Wi-Fi networks or when accessing sensitive information.
Additionally, Surfshark VPN allows you to bypass geo-restrictions and access region-locked content by masking your IP address and providing you with a virtual location in a different country.
This means you can enjoy streaming services, websites, and apps that may be restricted in your current location.
Moreover, Surfshark VPN protects you from online threats such as malware, phishing attempts, and intrusive ads through its built-in features like CleanWeb. By blocking unwanted content, Surfshark VPN ensures a safer and smoother browsing experience.


Lastly, Surfshark VPN offers unlimited simultaneous connections, allowing you to protect multiple devices with a single subscription, making it a cost-effective solution for securing your entire digital ecosystem.
Compatible Devices and Platforms
Surfshark VPN is compatible with a wide range of devices and operating systems, ensuring that you can protect your online activities regardless of the device you use. It supports major platforms, including:
- Windows
- macOS
- Android
- iOS
- Linux
- Fire TV
- Chromebook
- Browsers (Chrome, Firefox, and Edge extensions)
Whether you’re using a computer, smartphone, tablet, or even a smart TV, Surfshark VPN has you covered. In this section, we will guide you through the process of downloading and installing Surfshark VPN on your desired device.
Step-by-Step Guide: Downloading and Installing Surfshark VPN
Step 1: Visit the Surfshark VPN website
Open your preferred web browser and go to the Surfshark VPN website at www.surfshark.com (2-year deal with 82% OFF + 2 months free).
Step 2: Choose Your Subscription Plan
On the Surfshark homepage, you will find various subscription plans available. Select the plan that best suits your needs by clicking on the “Get Surfshark” or “Get Started” (2-year deal with 82% OFF + 2 months free) button.
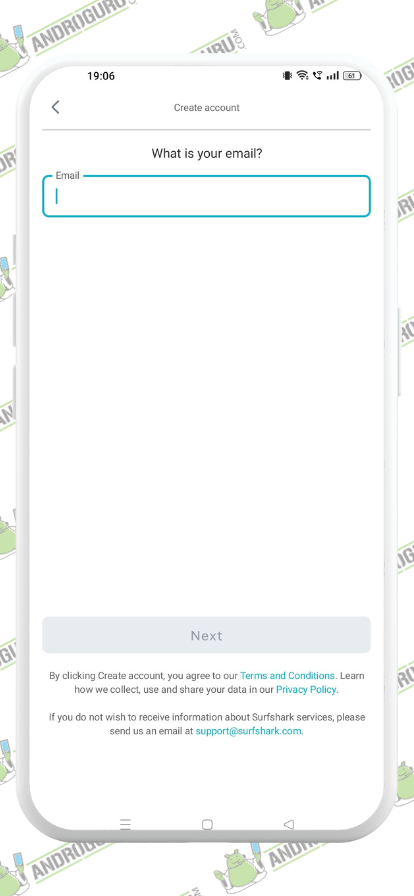
Step 3: Create an Account
To proceed with the subscription, you need to create an account. Enter your email address and create a strong password. Some plans may require additional information, such as your name and payment details. Fill in the necessary information and proceed to the next step.

Step 4: Select Additional Features (Optional)
Surfshark VPN offers additional features, such as HackLock and BlindSearch, which provide extra layers of security and privacy. Review these features and select any that you would like to add to your subscription.
Step 5: Choose Your Payment Method
Select your preferred payment method from the available options. Surfshark VPN supports various payment methods, including credit/debit cards, PayPal, cryptocurrencies, and more. Provide the necessary payment details and complete the payment process.
Step 6: Download and Install the App
Once your payment is confirmed, you will be redirected to the download page. Alternatively, you can navigate to the “Apps” section on the Surfshark website and select your device’s operating system.
- For desktop/laptop devices (Windows, macOS, Linux):
- Click on the corresponding download button to initiate the download of the Surfshark VPN application.
- Locate the downloaded file and run the installer.
- Follow the on-screen instructions to install the application on your device.
- For mobile devices running the Android OS):
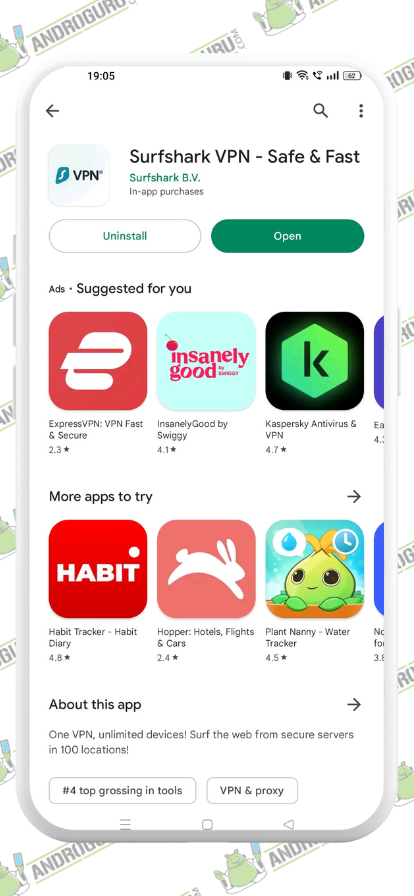
- Visit the Google Play Store (2-year deal with 82% OFF + 2 months free).
- Search for “Surfshark VPN” in the store’s search bar.
- Tap on the Surfshark VPN app and click the “Install” or “Get” button to download and install the app on your device.
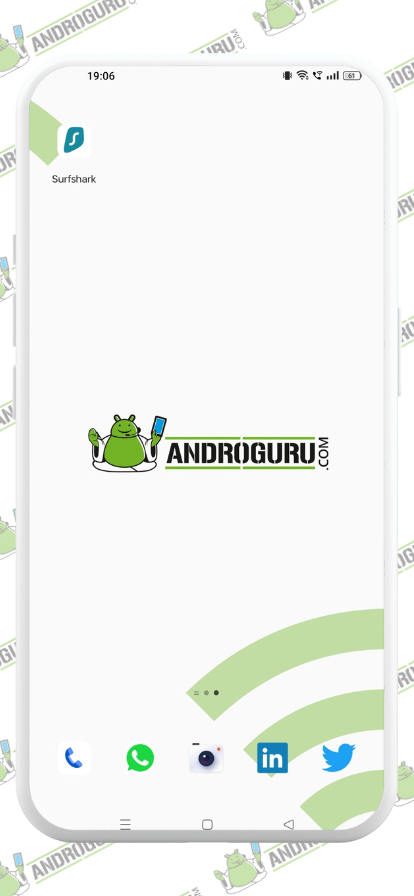
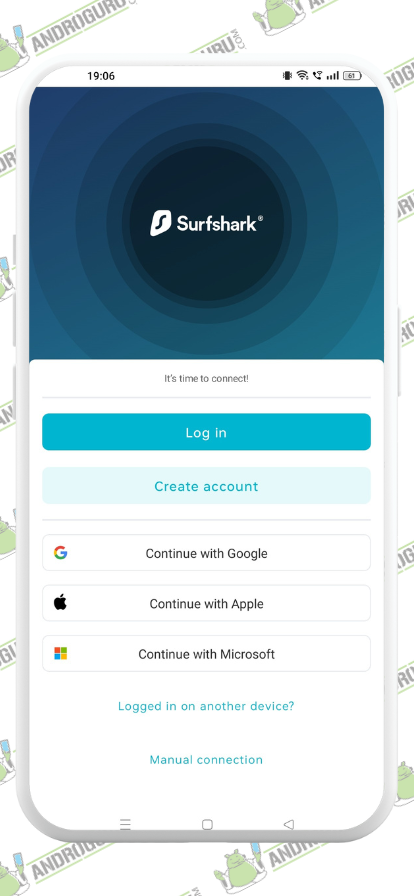
Step 7: Launch the App and Log In
Once the installation is complete, launch the Surfshark VPN app. You will be prompted to log in using the account credentials you created in Step 3. Enter your email address and password, then click on the “Log In” or “Sign In” button.
Step 8: Connect to a VPN Server
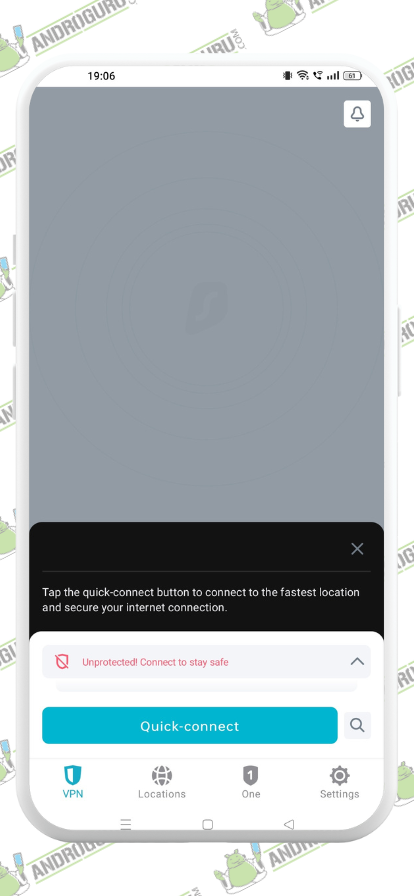
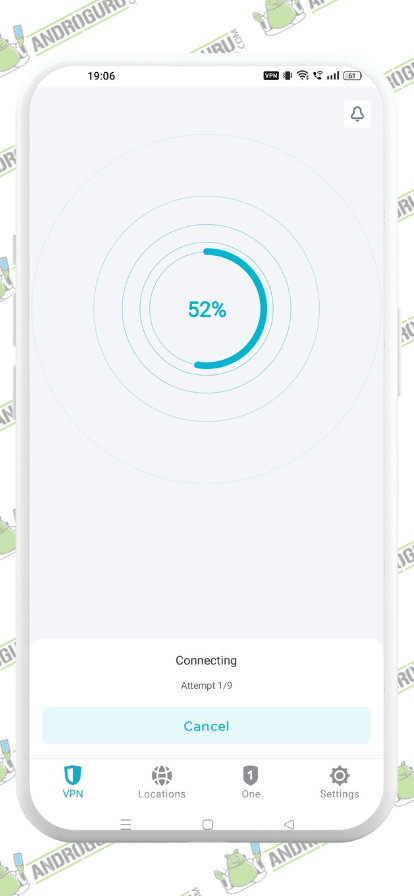
After logging in, you will be presented with the Surfshark VPN app interface. To establish a VPN connection, click on the “Connect” or “Quick Connect” button. The app will automatically connect you to the best available server based on your location.

Step 9: Customize and Explore Additional Features
Surfshark VPN provides various customization options and additional features to enhance your VPN experience. Explore the settings and features within the app, such as selecting specific server locations, enabling specific protocols, or activating features like CleanWeb.
Congratulations!
You have successfully downloaded, installed, and connected to Surfshark VPN on your device. Your online activities are now secured, and you can enjoy a private and unrestricted browsing experience.
In the next section, we will delve into the extensive features offered by Surfshark VPN, allowing you to make the most of this powerful VPN service.
Getting Started with Surfshark VPN
Now that you have successfully downloaded, installed, and connected to Surfshark VPN, it’s time to explore the extensive features and functionalities that the app offers. In this section, we will guide you through the process of getting started with Surfshark VPN and show you how to maximize its capabilities to ensure a secure and private online experience.
The User Interface
Upon launching the Surfshark VPN app, you will be greeted with a user-friendly interface that is designed to be intuitive and easy to navigate. Let’s take a closer look at the key elements of the app’s user interface:
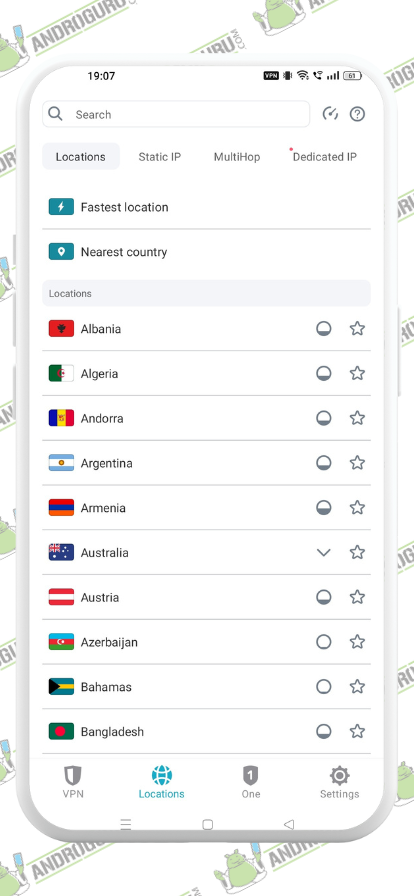
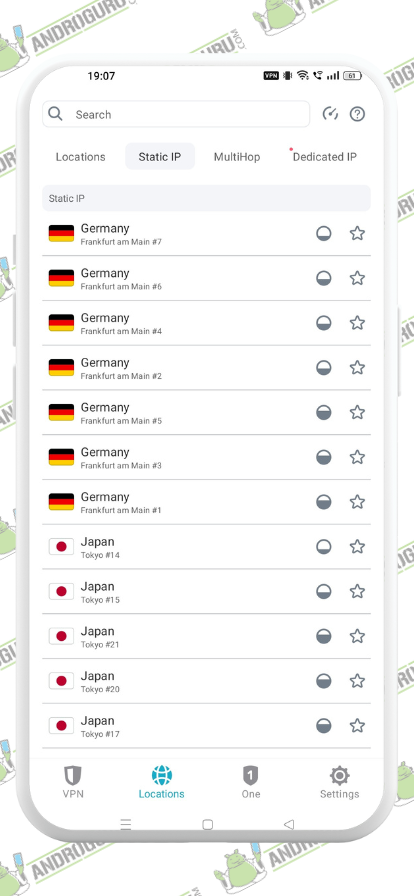
- Server Locations: At the top of the app, you will find a list of server locations available for you to connect to. Surfshark VPN boasts an extensive network of servers spread across various countries worldwide. You can either select a specific server manually or choose the “Quick Connect” option to connect to the best available server automatically.
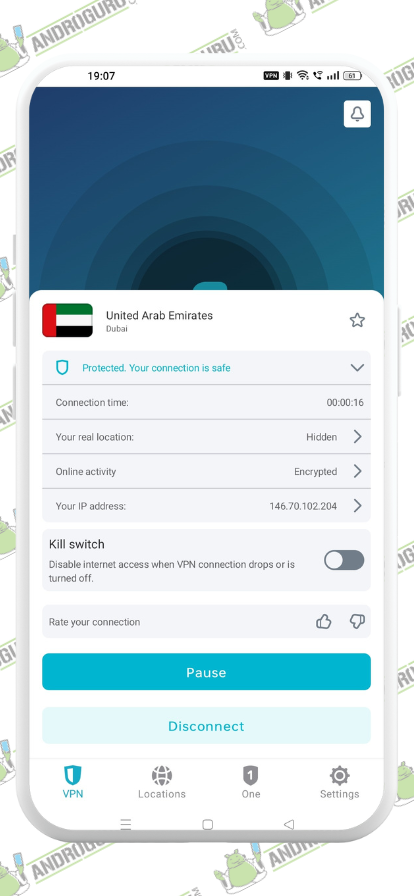
- Connection Status: The app displays your current connection status, indicating whether you are connected or disconnected from the VPN. When connected, you will see the duration of your connection, as well as your new virtual IP address.
- Virtual IP Address: Surfshark VPN assigns you a virtual IP address when connected to the VPN, masking your real IP address and providing you with an additional layer of privacy and anonymity.
- Quick Connect Button: By clicking the “Connect” or “Quick Connect” button, you can instantly establish a VPN connection with the best available server based on your location.
Selecting Server Locations
Surfshark VPN allows you to choose from a vast array of server locations around the world. This feature is particularly useful if you want to access content or websites that are geo-restricted in certain regions. To select a specific server location, follow these steps:
Step 1: Open the Surfshark VPN app on your device.
Step 2: Click on the “Locations” or “Servers” tab within the app.
Step 3: Browse through the list of available server locations and choose the country or city you want to connect to.
Step 4: Click on the desired server location to initiate the connection.
By selecting a server in a specific location, you can bypass geo-restrictions and access region-locked content from anywhere in the world.
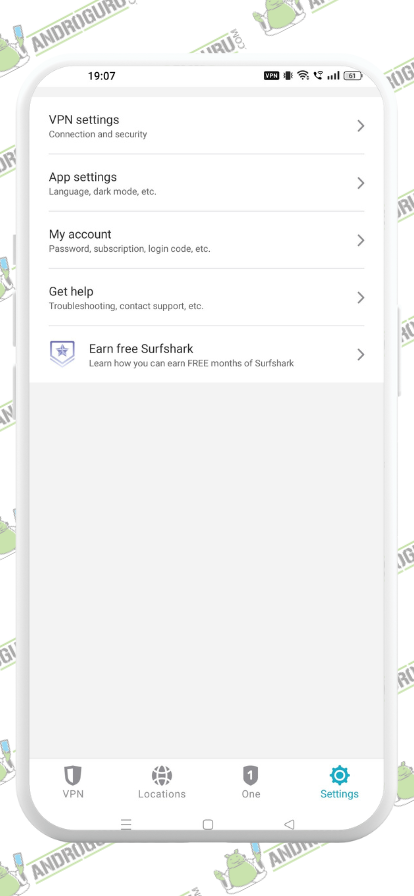
Advanced Features and Settings
Surfshark VPN offers a range of advanced features and settings that allow you to customize your VPN experience according to your preferences. Let’s explore some of these features:
- Whitelister (Split Tunneling): The Whitelister feature enables you to exclude specific apps or websites from the VPN tunnel. This is useful if you want certain apps or websites to bypass the VPN and maintain a direct connection.
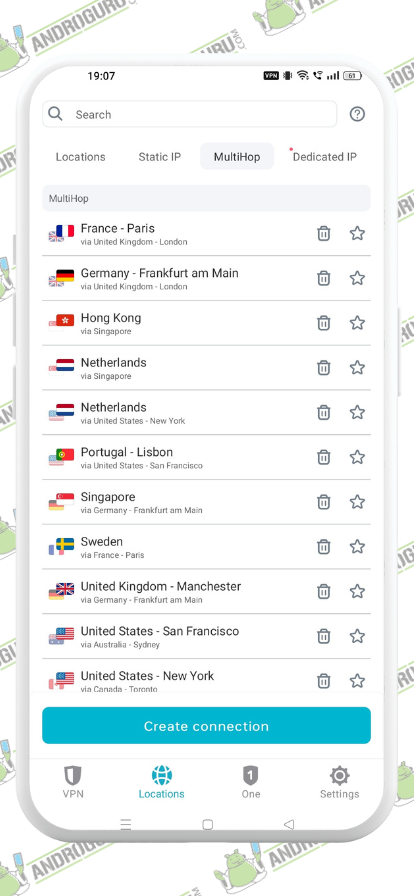
- MultiHop: MultiHop allows you to connect to multiple VPN servers simultaneously, providing an extra layer of encryption and privacy. This feature routes your internet traffic through two different VPN servers, making it even more challenging for anyone to trace your online activities.
- CleanWeb: CleanWeb is Surfshark VPN’s built-in ad-blocking and malware protection feature. Enabling CleanWeb helps block intrusive ads, pop-ups, and protects you from accessing malicious websites.
- Kill Switch: The Kill Switch feature is designed to ensure that your internet connection is automatically terminated if the VPN connection drops unexpectedly. This prevents any unprotected data from being exposed, maintaining your privacy and security.
- Protocol Selection: Surfshark VPN supports multiple protocols, including OpenVPN UDP/TCP and IKEv2. You can choose your preferred protocol based on your needs, whether it’s for speed, security, or compatibility.
Troubleshooting and Support
In case you encounter any issues while using Surfshark VPN, the app provides a comprehensive troubleshooting guide and a dedicated support team to assist you.
You can access the support section within the app or visit the Surfshark website for further assistance.
Exploring the Key Features of Surfshark VPN
Surfshark VPN is packed with a wide range of features that go beyond basic VPN functionality. In this section, we will explore some of the key features that make Surfshark VPN stand out among other VPN providers. These features are designed to enhance your online security, privacy, and browsing experience. Let’s dive in!

CleanWeb
Ad-blocking and Malware Protection One of the standout features of Surfshark VPN is CleanWeb. With CleanWeb enabled, you can enjoy a cleaner and safer browsing experience. CleanWeb acts as an ad-blocker, eliminating intrusive ads, pop-ups, and banners from websites you visit. By blocking these ads, CleanWeb not only enhances your browsing speed but also prevents potential threats and malware from infiltrating your device.
To enable CleanWeb:
Step 1: Open the Surfshark VPN app on your device.
Step 2: Navigate to the settings or features section of the app.
Step 3: Locate the CleanWeb feature and toggle the switch to enable it.
Once enabled, CleanWeb will automatically block ads and protect you from accessing harmful websites.
Whitelister (Split Tunneling)
The Whitelister feature, also known as split tunneling, offers you greater control over your VPN connection.
With Whitelister, you can choose specific apps or websites to bypass the VPN tunnel. This is particularly useful if you want to access local content or devices that require a direct connection.
To use Whitelister:
Step 1: Open the Surfshark VPN app on your device.
Step 2: Go to the settings or features section of the app.
Step 3: Locate the Whitelister or split tunneling feature and enable it.
Step 4: Select the apps or websites that you want to exclude from the VPN tunnel.
By whitelisting certain apps or websites, you can enjoy a seamless browsing experience while still maintaining the protection of Surfshark VPN for other applications.
MultiHop: Double the Encryption, Double the Security
MultiHop is a unique feature offered by Surfshark VPN that adds an extra layer of security and privacy to your online activities.
By connecting to multiple VPN servers simultaneously, MultiHop routes your internet traffic through two different servers, making it even more challenging for anyone to trace your online footprint.
To use MultiHop:
Step 1: Open the Surfshark VPN app on your device.
Step 2: Navigate to the server selection screen.
Step 3: Look for the MultiHop option or feature.
Step 4: Choose the desired MultiHop server configuration.
By using MultiHop, your data is encrypted and routed through two servers in different locations, providing enhanced privacy and anonymity.
Camouflage Mode: Concealing Your VPN Usage
Surfshark VPN’s Camouflage Mode is designed to hide the fact that you are using a VPN. This feature helps you bypass VPN blocking and censorship measures implemented by certain networks or countries.
With Camouflage Mode enabled, your internet service provider (ISP) or other parties cannot detect that you are using a VPN, ensuring unrestricted access to the internet.
To enable Camouflage Mode:
Step 1: Open the Surfshark VPN app on your device.
Step 2: Go to the settings or features section of the app.
Step 3: Locate the Camouflage Mode feature and toggle the switch to enable it.
By enabling Camouflage Mode, you can maintain a seamless and uninterrupted connection to the internet while enjoying the security and privacy benefits of Surfshark VPN.
NoBorders Mode: Access the Open Internet
In regions where internet censorship is prevalent, accessing the open internet can be a challenge. Surfshark VPN’s NoBorders Mode is specifically designed to overcome these restrictions and provide you with unrestricted access to online content.
To enable NoBorders Mode:
Step 1: Open the Surfshark VPN app on your device.
Step 2: Navigate to the settings or features section of the app.
Step 3: Locate the NoBorders Mode feature and toggle the switch to enable it.
Once enabled, NoBorders Mode helps you bypass geo-restrictions and access blocked websites, allowing you to enjoy the internet without limitations.
These are just a few of the many features offered by Surfshark VPN. From its advanced security protocols to its user-friendly interface, Surfshark VPN is designed to provide you with a seamless and secure browsing experience. Make sure to explore the app further to discover additional features that suit your specific needs.
Advanced Configuration and Customization
Surfshark VPN offers a range of advanced configuration and customization options that allow you to tailor the VPN experience to your specific needs. In this section, we will explore some of the advanced features and settings available in the Surfshark VPN app.
Let’s get started!
Protocol Selection
Surfshark VPN supports multiple VPN protocols, each with its own advantages and characteristics. Depending on your requirements, you can choose the protocol that best suits your needs. Here are the available protocols:
- OpenVPN: This is the most widely used and trusted VPN protocol. It offers a good balance of speed and security.
- IKEv2: IKEv2 is known for its fast connection speeds and stability, making it ideal for mobile devices.
- WireGuard: WireGuard is a newer VPN protocol that offers high-speed connections and robust security.
To configure the VPN protocol:
Step 1: Open the Surfshark VPN app on your device.
Step 2: Go to the settings or configuration section of the app.
Step 3: Look for the protocol selection option.
Step 4: Choose the desired protocol from the available options.
By selecting the appropriate VPN protocol, you can optimize your connection speed and security level.
Kill Switch
The Kill Switch feature ensures that your internet connection is always protected, even if the VPN connection drops unexpectedly.
When the Kill Switch is enabled, it will automatically block your internet traffic if the VPN connection becomes unstable or disconnected. This prevents your data from being exposed to your internet service provider or other potentially malicious entities.
To enable the Kill Switch:
Step 1: Open the Surfshark VPN app on your device.
Step 2: Navigate to the settings or features section of the app.
Step 3: Locate the Kill Switch feature and toggle the switch to enable it.
Once enabled, the Kill Switch will provide an additional layer of security, ensuring that your online activities remain private and protected.
Multi-Device Support
Surfshark VPN allows you to protect multiple devices simultaneously with a single subscription. This multi-device support enables you to secure your smartphone, tablet, computer, and other devices using a single Surfshark VPN account. This is particularly convenient for users who have multiple devices or want to ensure consistent privacy across all their devices.
To set up Surfshark VPN on multiple devices:
Step 1: Download and install the Surfshark VPN app on each device you want to protect.
Step 2: Sign in to your Surfshark VPN account on each device using your credentials.
Step 3: Connect to a VPN server on each device to activate the protection.
By utilizing the multi-device support feature, you can enjoy the benefits of Surfshark VPN on all your devices without any additional costs.
Whitelister (Split Tunneling) Configuration
Above, we discussed the Whitelister feature, which allows you to exclude certain apps or websites from the VPN tunnel. With Surfshark VPN, you have the flexibility to customize your Whitelister settings based on your preferences.
To configure Whitelister settings:
Step 1: Open the Surfshark VPN app on your device.
Step 2: Go to the settings or features section of the app.
Step 3: Locate the Whitelister or split tunneling feature.
Step 4: Customize the Whitelister settings by selecting specific apps or websites to exclude from the VPN tunnel.
By configuring the Whitelister settings, you can fine-tune your VPN connection to meet your specific requirements, such as accessing local content or devices that require a direct connection.
Advanced Settings and Preferences
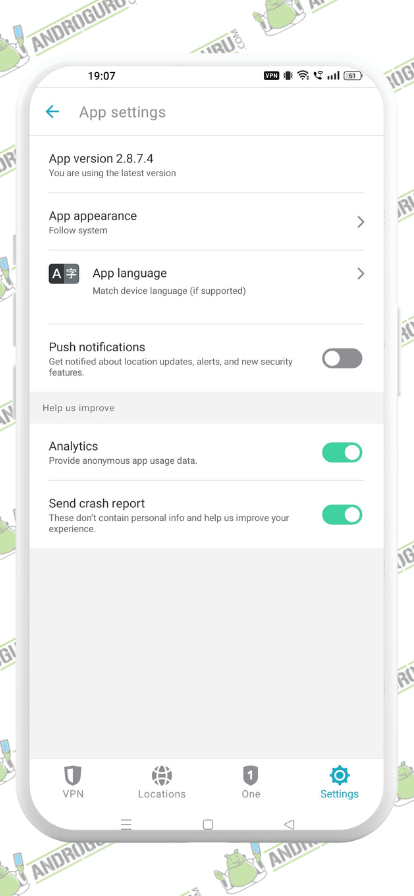
Surfshark VPN also provides a range of advanced settings and preferences that allow you to further customize your VPN experience. Some of the advanced options you may find in the settings section include:
- DNS leak protection: This feature ensures that your DNS requests are encrypted and do not leak outside the VPN tunnel.
- CleanWeb: CleanWeb blocks ads, trackers, malware, and phishing attempts, enhancing your browsing experience and protecting you from online threats.
- Auto-connect: You can set the VPN app to automatically connect to a VPN server whenever you launch specific apps or connect to a particular network.
- Language and appearance: Surfshark VPN offers various language options and allows you to customize the app’s appearance to suit your preferences.


Exploring these advanced settings and preferences will enable you to personalize your VPN experience and optimize it for your specific needs.
Troubleshooting and Support
While Surfshark VPN strives to provide a seamless and reliable VPN experience, there may be instances where you encounter issues or require assistance. In this section, we will explore the troubleshooting steps and support options available to help you resolve any problems you may face. Let’s dive in!
Common Issues and Troubleshooting Steps
If you encounter any difficulties while using Surfshark VPN, here are some common issues you may come across along with corresponding troubleshooting steps:
Issue 1: Connection Failure Troubleshooting Steps:
- Check your internet connection: Ensure that you have a stable and working internet connection.
- Try different VPN servers: Sometimes, a specific VPN server may experience temporary issues. Switch to a different server and see if the connection improves.
- Change VPN protocols: Experiment with different VPN protocols (OpenVPN, IKEv2, WireGuard) to find the most stable and reliable option for your network.
- Disable firewalls or antivirus software: In some cases, firewalls or antivirus software may interfere with the VPN connection. Temporarily disable them and check if the issue persists.
- Contact Surfshark VPN support: If the problem persists, reach out to Surfshark VPN’s customer support for further assistance.
Issue 2: Slow Connection Speed Troubleshooting Steps:
- Connect to a nearby server: Select a VPN server located closer to your physical location to reduce latency and improve connection speed.
- Switch VPN protocols: Experiment with different VPN protocols to find the one that offers the best balance of speed and security for your network.
- Close bandwidth-intensive applications: If you have multiple bandwidth-consuming applications running in the background, closing them may improve the overall connection speed.
- Contact Surfshark VPN support: If the issue persists, contact Surfshark VPN’s support team for further guidance.
Support Options
Surfshark VPN offers comprehensive support options to assist users in resolving any issues they may encounter. Here are the available support channels:
- Knowledge Base: Surfshark VPN maintains a detailed knowledge base that includes FAQs, setup guides, troubleshooting articles, and other useful resources. The knowledge base is easily accessible on the Surfshark website and covers a wide range of topics related to VPN usage.
- Live Chat: Surfshark VPN provides live chat support, allowing you to directly communicate with their support team in real-time. The live chat feature is available 24/7 and is a convenient way to get immediate assistance with any queries or issues you may have.
- Email Support: If you prefer to communicate via email, you can reach out to Surfshark VPN’s support team by sending an email to their designated support address. They aim to respond to inquiries promptly and provide the necessary guidance to resolve any concerns.
- Social Media: Surfshark VPN maintains an active presence on social media platforms such as Twitter, Facebook, and Instagram. You can follow their accounts and reach out to them via direct messages or comments for support-related queries.
When contacting support, it’s helpful to provide detailed information about the issue you are facing, including any error messages, screenshots, or steps to reproduce the problem. This will allow the support team to assist you more efficiently.
Throughout this detailed review, we have explored the various aspects of Surfshark VPN, from understanding the need for a VPN to advanced configuration and troubleshooting.
Let’s summarize the key highlights that make Surfshark VPN a compelling choice for users seeking a secure and private browsing experience.
First and foremost, Surfshark VPN recognizes the growing concerns surrounding privacy and hackers’ activities. With its robust encryption protocols and strict no-logs policy, Surfshark VPN ensures that your online activities remain private and protected from prying eyes.
Whether you are browsing the web, streaming content, or accessing public Wi-Fi networks, Surfshark VPN encrypts your data, making it virtually impossible for anyone to intercept or track your online behavior.
Downloading and installing Surfshark VPN is a hassle-free process, thanks to its user-friendly interface and compatibility with various devices and operating systems. The step-by-step tutorial provided in this review guides you through the installation process, ensuring that even beginners can set up and start using the VPN without any difficulties. Additionally, Surfshark VPN offers a generous unlimited simultaneous connections policy, allowing you to protect all your devices with a single subscription.
Once you’ve installed Surfshark VPN, its extensive features come into play, elevating your browsing experience to new heights.
With a vast network of servers spread across numerous countries, Surfshark VPN enables you to bypass geographical restrictions and access geo-blocked content from anywhere in the world.
Whether you want to stream your favorite shows on Netflix, access restricted websites, or engage in online gaming, Surfshark VPN ensures seamless and unrestricted access to the content you desire.
Moreover, Surfshark VPN goes beyond basic VPN functionality and offers additional features that enhance your online security and browsing experience.
CleanWeb, Surfshark VPN’s built-in ad and malware blocker, ensures that you can browse the web without annoying ads and potential threats.
The MultiHop feature allows you to route your internet traffic through multiple servers, adding an extra layer of anonymity. Other features, such as Whitelister and Camouflage Mode, provide additional flexibility and protection for specific browsing activities.
For those seeking advanced configuration and customization options, Surfshark VPN delivers. The review highlights various advanced settings, including VPN protocols, kill switch functionality, and split tunneling, allowing users to tailor their VPN experience according to their specific requirements.
Whether you’re an experienced user or a novice, Surfshark VPN offers a balance between simplicity and customization, ensuring that you can optimize your VPN settings without feeling overwhelmed.
Inevitably, there may be instances where you encounter issues or require support. Surfshark VPN provides comprehensive support options, including a knowledge base, live chat, email support, and a social media presence.
These channels ensure that you can access the necessary guidance and assistance whenever you need it, allowing for a smooth and hassle-free VPN experience.
To conclude, Surfshark VPN presents itself as a compelling choice for individuals looking to enhance their online privacy, security, and browsing experience.
By prioritizing user privacy, offering an extensive range of features, and providing robust support options, this VPN distinguishes itself as a reliable and user-centric VPN solution for your use, and needs.
As you consider your VPN options, Surfshark VPN’s commitment to privacy, its intuitive interface, and its comprehensive feature set make it a strong contender that deserves serious consideration.
We would love to hear your thoughts, experiences, and suggestions about Surfshark VPN – Safe & Fast on Android in the comments below.