How to Change the Navigation Voice in Google Maps
Google Maps allows you to customize the voice as per your liking if you don't like the default one on your phone.

Google Maps has revolutionized the way we navigate and travel to our destinations. Gone are the days of relying on physical maps or asking strangers for directions.
With Google Maps, users can easily find their way, saving time and eliminating the hassle of getting lost. This popular mapping service offers comprehensive features, including voice navigation, ensuring that users can reach their destinations smoothly and efficiently.
Google Maps is renowned worldwide as one of the most widely used and trusted mapping services. It provides users with accurate and up-to-date navigation information, enabling them to travel to any distance with ease.
The app’s primary objective is to guide users efficiently, offering step-by-step directions to their desired locations.
One of the standout features of Google Maps is its voice navigation functionality. This feature allows users to receive real-time voice instructions while navigating, eliminating the need to constantly glance at their phones.
By providing audio guidance, Google Maps ensures a safer and more convenient travel experience.
However, listening to the same voice for directions can become monotonous over time. Google Maps addresses this issue by offering customization options for the voice used in navigation.
Users have the freedom to choose a different voice that suits their preferences, ensuring a more personalized navigation experience.
Changing the voice in Google Maps is a simple process that enhances user engagement and enjoyment. Unfortunately, the feature currently does not provide gender variations, limiting the choice to only one voice option.
Furthermore, Google Maps automatically adjusts to the country domain you are in, displaying place names in the local language. This feature facilitates navigation and enhances the overall user experience, especially when traveling to foreign countries.
However, if you prefer a different language or want to change the country domain, Google Maps offers the flexibility to modify these settings according to your preferences. This allows users to customize their experience further, ensuring that they receive directions and place names in their desired language.
In this article, we will guide you through the process of changing the voice and language settings in Google Maps. By following these steps, you can customize your navigation experience to suit your preferences and make your journeys even more enjoyable.
Follow these simple steps to easily change the navigation voice:
Step 1
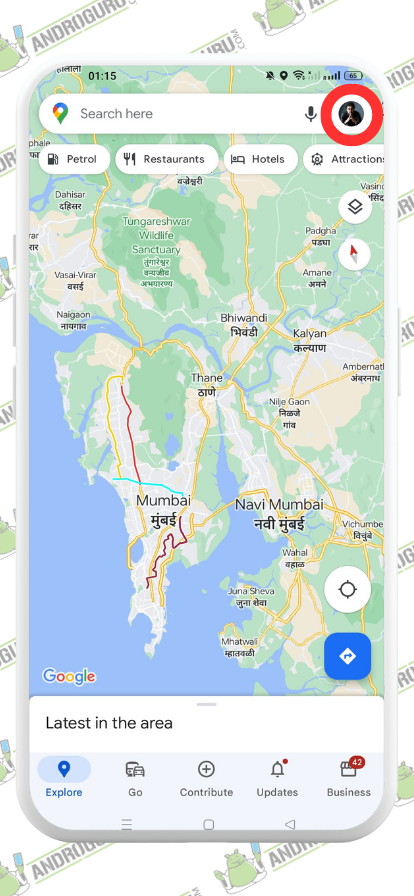
To begin, open the Google Maps app on your device. The Google Maps app is typically represented by a colorful map pin icon. Locate and tap on this icon to launch the app.
Upon opening the app, you will be presented with the map view, where you can explore different locations and access various features.
At the top of the screen, you will see a search bar, usually situated in the middle or at the top left corner. Within the search bar, there is a circular icon that represents your Google account.
Tap on this circular account icon, and a dropdown menu will appear. This menu provides access to various personalization options and settings associated with your Google account and the Google Maps app.
By tapping on the account icon, you are signaling your intention to customize specific settings within the Google Maps app. This will lead you to the next step, where you can access the settings menu and make the necessary adjustments to change the voice used for navigation.
Step 2
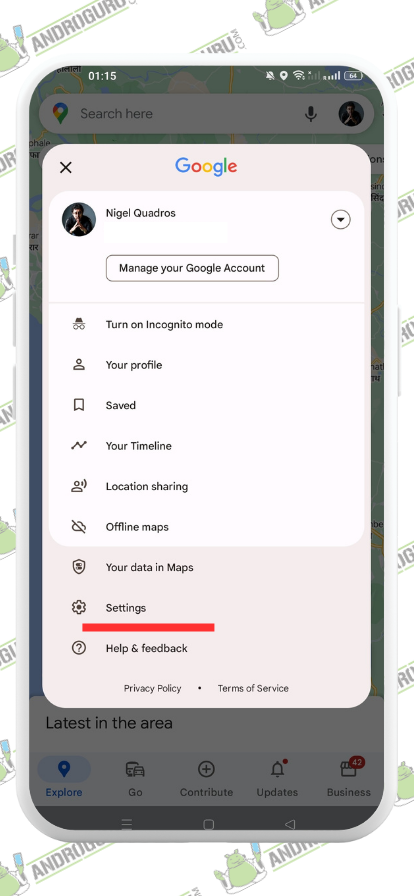
Once you have tapped on the circular account icon, a dropdown menu will appear on the screen. Within this menu, you will find several options related to your Google account and the Google Maps app. Look for the “Settings” option and tap on it.
By selecting the “Settings” option, you will be taken to a dedicated settings screen that allows you to customize various aspects of the Google Maps app according to your preferences.
The settings screen serves as a central hub where you can modify different features, adjust preferences, and fine-tune the behavior of the Google Maps app. It provides you with greater control over how the app functions and how information is displayed.
Accessing the settings menu is an essential step in changing the voice used for navigation within the Google Maps app. In the next step, you will navigate to the specific section within the settings where you can modify the voice selection settings.
Step 3
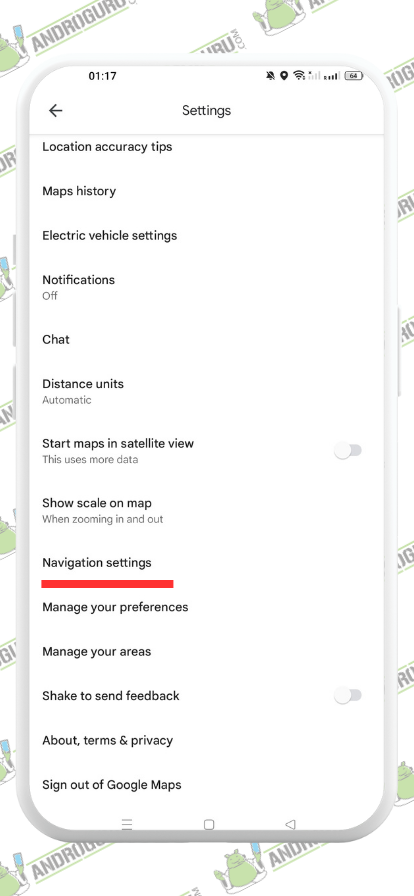
Within the settings menu, you will need to locate and tap on the “Navigation Settings” option. This option is specifically designed to allow you to customize various settings related to navigation within the Google Maps app.
By selecting the “Navigation Settings” option, you will be presented with a range of settings and preferences related to navigation, including voice guidance, route options, and display settings.
This step is crucial as it takes you to the section where you can specifically modify the voice selection settings. The “Navigation Settings” section provides you with the ability to personalize your navigation experience and tailor it to your liking.
By accessing this section, you are one step closer to changing the voice used for providing directions and guidance while using Google Maps.
In the following step, you will proceed to the voice selection settings, where you can choose a different voice option that suits your preferences.
Step 4
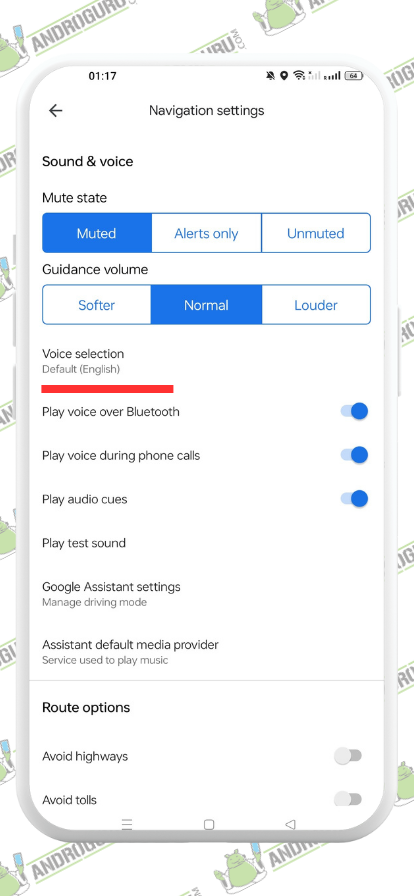
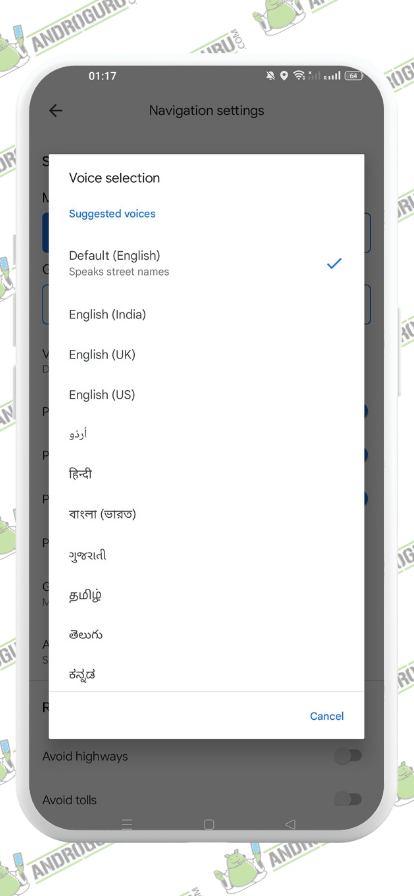
After accessing the “Navigation Settings” in Google Maps, you will need to locate and tap on the “Voice selection” option. This option allows you to choose from a list of available voices that can be used for providing directions and guidance during your navigation.
When you tap on the “Voice selection” option, you will be presented with a variety of voice options to choose from.
These options may include different accents, languages, or variations in speech styles. The available voices may vary depending on your device’s language settings and the region you are in.
Take your time to browse through the list of available voices and select the one that you prefer or find most suitable for your navigation experience. You can listen to sample voices to get an idea of how they sound before making your selection.
It’s worth noting that the available voices may be periodically updated by Google, so you may come across new options or variations in voice selections over time.
This allows you to personalize your navigation experience and choose a voice that you find pleasant or easy to understand.
Once you have made your voice selection, you can proceed to the next step to complete the process and enjoy the navigation directions in your preferred voice.
Step 5
After selecting your preferred voice from the list of available options in Google Maps, you can proceed to switch the voice to that setting. This step finalizes the process of changing the voice for the navigation directions in the app.
To switch to your chosen voice, simply tap on the voice option you have selected. The app will automatically apply the changes, and the new voice will be set as the default for providing directions during your navigation.
It’s important to note that once you switch to a new voice, it will be used consistently for all navigation instructions until you decide to change it again. This ensures a consistent and personalized experience throughout your journeys.
Changing the voice in Google Maps can add a touch of customization and personalization to your navigation experience.
Whether you prefer a voice that sounds more natural, has a different accent, or speaks in a language of your choice, this feature allows you to tailor the directions to your preferences.
By following these steps, you can easily change the voice used for navigation within the Google Maps app.
This allows you to customize your navigation experience and listen to directions in a voice that aligns with your preferences. Experiment with different voices to find the one that enhances your overall journey.





One Comment