


For many years, passwords have served as the primary method for securing our online accounts. They are essentially a combination of characters, created alongside a username or email address, that act as a secret code granting access to specific websites or applications. The importance of passwords lies in their memorability and the necessity to keep them confidential.
Establishing passwords, ensuring their security, and remembering them all demand effort from users. Some individuals struggle to remember complex passwords, leading them to reuse the same ones repeatedly or opt for weak and easily guessable alternatives.
Unfortunately, these practices expose users to vulnerabilities and make them susceptible to various forms of attacks.
Fortunately, several technologies have emerged with the goal of eliminating the need for passwords altogether. One particularly promising solution is biometric authentication, which leverages a person’s distinct biological characteristics like fingerprints, facial features, or voice patterns to verify their identity.
These passwordless authentication methods not only offer enhanced security compared to traditional passwords but also provide convenience and user-friendliness.
Users are relieved from the burden of typing and recalling passwords, as their unique biological traits serve as the key to their digital identities.
Consequently, there has been a noticeable shift towards a passwordless future in recent years, fueled by the increasing adoption of these innovative authentication technologies.
OK! Now What Is Google Passkeys
Google Passkeys is an innovative authentication technology developed by Google, designed to offer a passwordless login experience for Google accounts. This cutting-edge method utilizes biometric authentication, similar to other biometric systems, to verify users’ identities when signing in.

By leveraging the power of your smartphone, Google Passkeys allows you to use your device as an authentication tool. When you attempt to sign in to a website or app on your phone or desktop, you simply need to unlock your phone, and voila! You are seamlessly signed in to your account without the need to enter a password.
Google Passkeys is built upon the standard established by the FIDO Alliance and the World Wide Web Consortium, ensuring its compatibility and interoperability across different platforms and devices.
The process is straightforward: when a user tries to log in to their Google account on a computer using their phone, they will receive a notification on their Android smartphone. This notification prompts them to verify and confirm the login attempt.
To authenticate and confirm the login process, the user can utilize various biometric authentication methods, including fingerprint recognition, facial recognition (FaceID), PIN, or pattern lock.

To utilize Google Passkeys, users must first register their mobile phone as a physical authentication device. Once the registration is complete, they can log in to their Google account on another device.
As mentioned earlier, upon login, the user will receive a notification on their smartphone, requesting confirmation for the authentication.
Google Passkeys employs Bluetooth Low Energy (BLE) technology to establish a secure connection between the authentication device (the user’s phone) and the device they intend to sign in with.
How To Setup and Use Google Passkeys
Before proceeding with the Google Passkeys setup, it is essential to ensure that your device meets the necessary compatibility requirements mentioned earlier. Once you have confirmed compatibility, you can follow the steps below to set up Google Passkeys on an Android device:

- Open your preferred web browser on your Android device.
- Visit the website “myaccount.google.com” by entering the URL in the browser’s address bar.
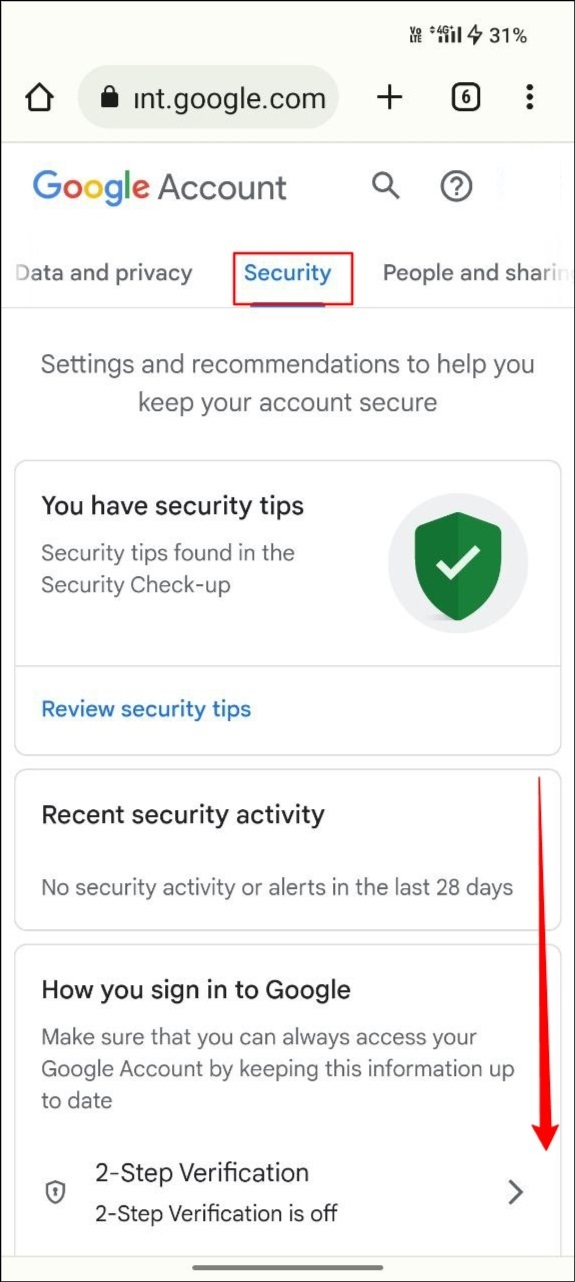
- In the top navigation bar of the Google Account settings page, locate and click on the “Security” tab. This tab is typically represented by a padlock or shield icon.
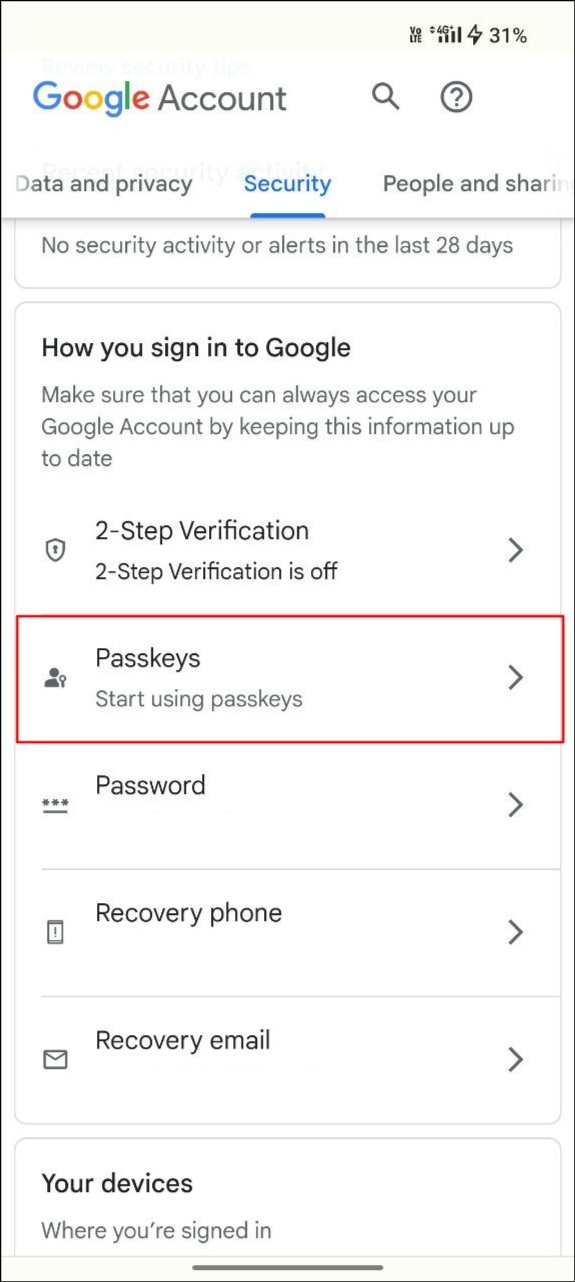
- Scroll down the security settings page until you find the section labeled “Passkeys.” Click on it to access the Passkeys settings.


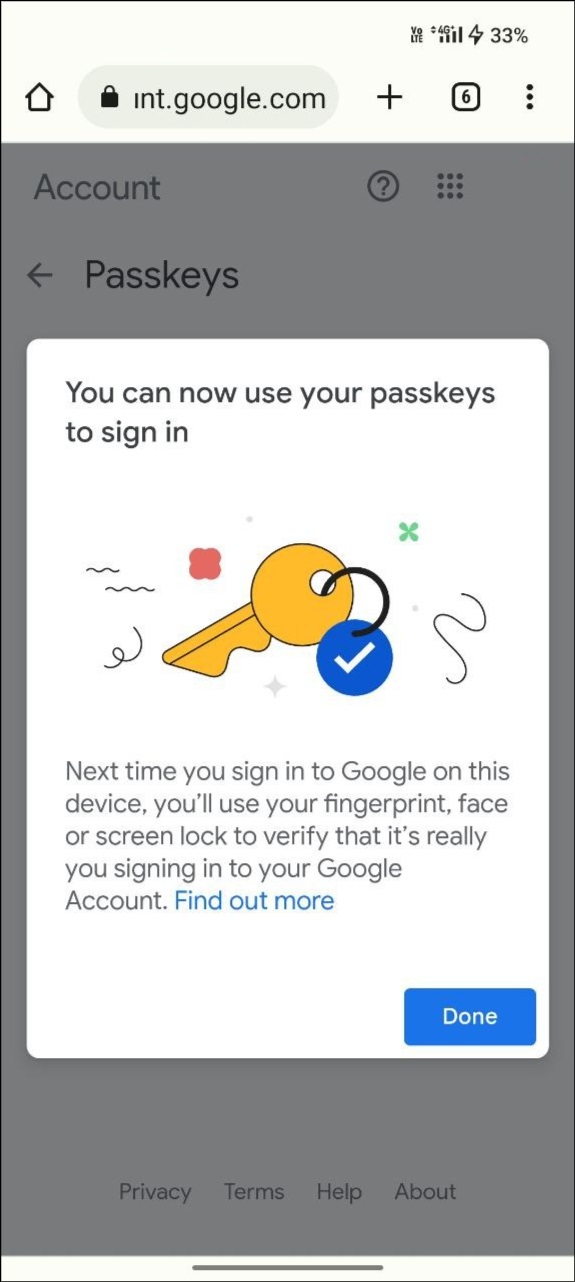
Within the Passkeys settings, you should see an option or button that says “Use Passkeys.” Click on it to initiate the Passkeys setup process.
Now, you have successfully created a passkey for your Google account. This passkey will now serve as your authentication method when signing in to your Google account, eliminating the need to enter a traditional password.
Google Passkeys setup on Desktop
To set up Google Passkeys on your desktop using a different Google account, follow the steps below:
- Open your preferred web browser on your desktop computer.
- Enter the following URL in the address bar: “https://accounts.google.com/“.
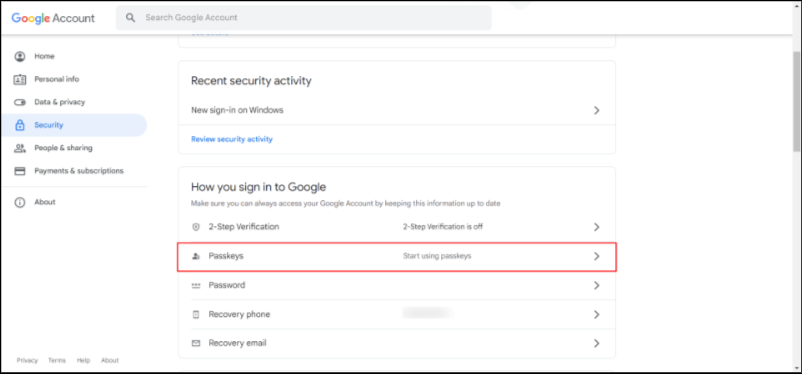
- On the Google Accounts page, look for the left navigation bar and click on the “Security” tab. This tab is usually represented by a padlock or shield icon.
- You will be prompted to enter your Google account password. Type in your password and click “Next” to proceed. In case you have forgotten your password, you can click on the “Forgot password” option to initiate the password recovery process.
- Once you have successfully entered your password, locate and click on the option labeled “Use Passkeys” within the security settings.
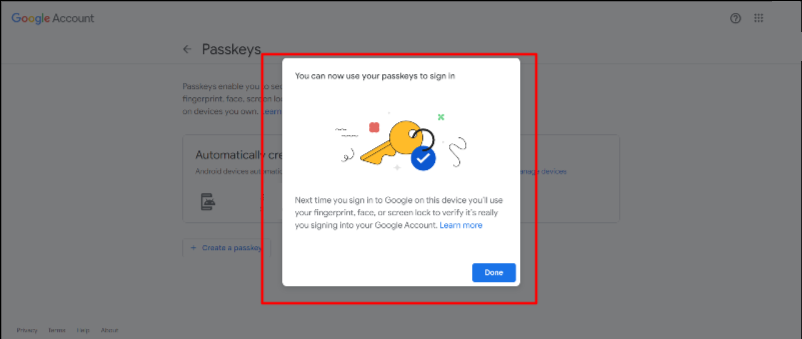
- A prompt will appear, instructing you to continue creating a passkey on your device. Click on the “Continue” button to proceed.

Now, you have now successfully created a Google Passkey for your Google account on your desktop device. You will receive a confirmation message stating “You can sign in with your master key,” indicating that the Passkey setup process is complete.
Please note that setting up Google Passkeys using a different Google account on your desktop will not cause any issues.
Each Google account can have its own Passkey associated with it, providing secure and convenient authentication for each individual account.
How To Use Google Passkeys to Sign in With Your Account
Using Google Passkeys to log in to Google accounts is indeed a simple process. However, there are a few considerations to keep in mind before utilizing this passwordless authentication method. Here is a step-by-step guide to signing in to Google accounts using Passkeys:
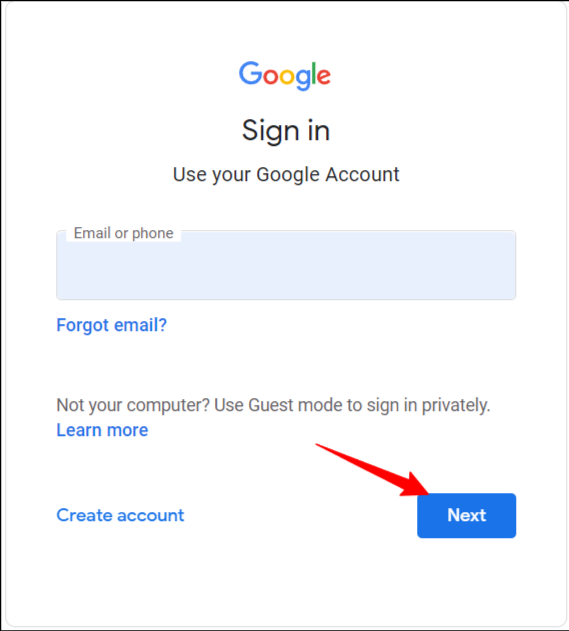
- Open your preferred web browser on your device and navigate to the Google sign-in page.
- Enter the email address associated with your Google account and click “Next.” Ensure that the email address you provide has Passkeys enabled.
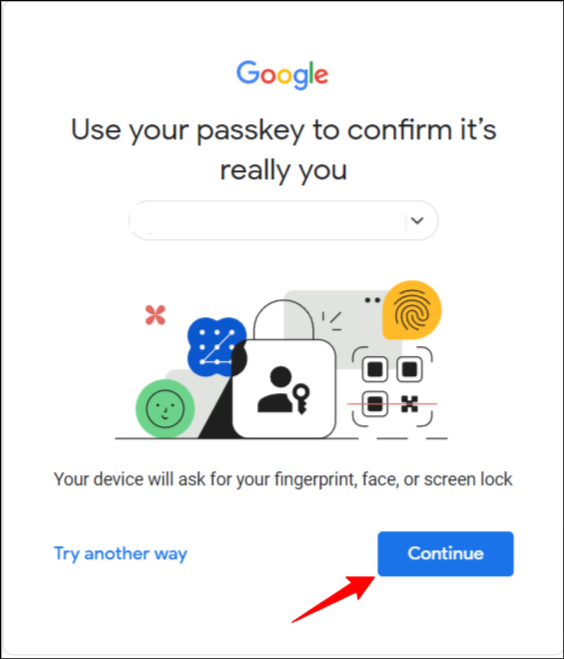
- If your Google account has Passkeys enabled, you will see a prompt to sign in with your Google Passkey. Click on “Continue” to proceed with using Passkeys for authentication. If you don’t see this prompt, it indicates that you haven’t set up Passkeys for your Google account. In that case, you can refer to the steps mentioned earlier to set up Passkeys.
- A pop-up will appear, prompting you to select the authentication device. Choose the appropriate authentication device from the list displayed. Remember, both the device you are currently using to sign in and the authentication device must be connected via Bluetooth.
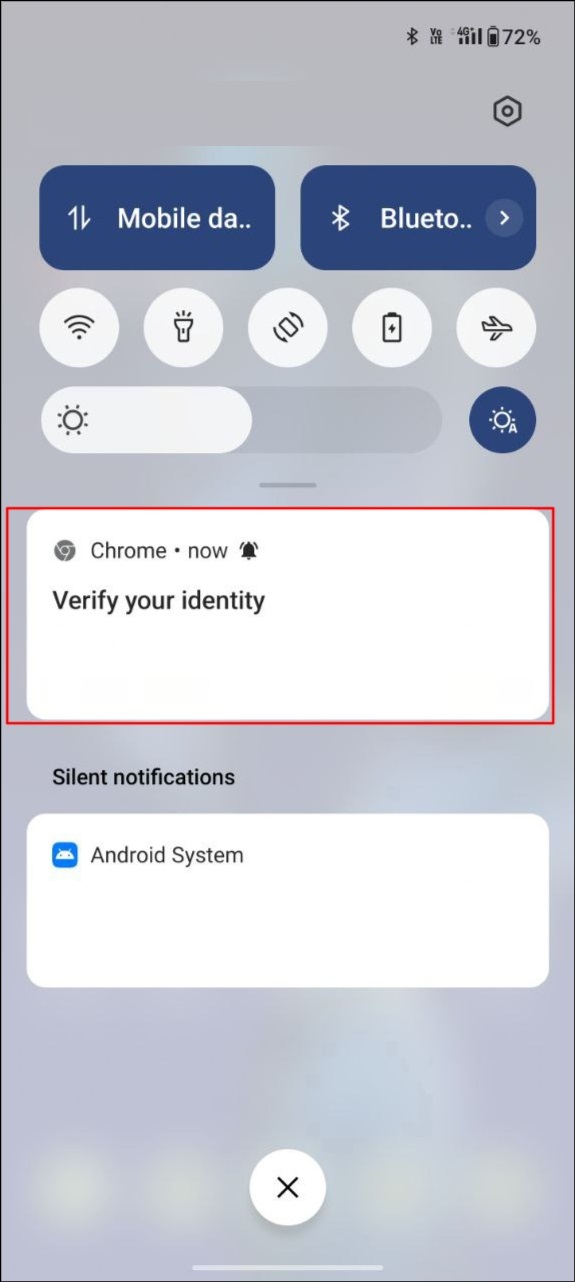
- On your chosen authentication device, you will receive a notification to confirm the authentication. Tap on the notification, and depending on your device’s biometric settings, you may be prompted to enter your password, pattern, or provide your fingerprint to authenticate the device.
- Once the authentication process is successfully completed, you will be automatically signed in to your Google account on the device you are using to sign in.
You can follow this same process to sign in to your Google account using Passkeys on various devices, including PCs, desktops, and Android devices.
Please ensure that your Google account is enrolled with the authentication device and that the device you are using for authentication is connected to the sign-in device via Bluetooth for a seamless and secure authentication experience.
Best Practices for Using Google Passkeys
- In addition to using Google Passkeys for authentication, enabling two-factor authentication (2FA) can provide an extra layer of security for your Google account. Here are some important points to consider:
- Enable Two-Factor Authentication (2FA): Two-factor authentication adds an additional step to the login process by requiring a second form of verification, such as a unique code sent to your phone or generated by an authentication app. This provides an added layer of protection for your Google account, even when using Passkeys.
- Avoid Public and Shared Devices: It is highly recommended not to create Passkeys on public or shared devices. Public devices may not have adequate security measures in place, and others who use the same device could potentially access your Google account if you have created Passkeys on it. Stick to using Passkeys on your personal and trusted devices.
- Sign Out of Your Google Account: If necessary, ensure that you sign out of your Google account from devices that you no longer use or have shared access with. When you remove your Google account from a device, the associated Passkeys will also be removed. This is particularly important when using third-party apps for Passkeys; sign out from your Google account on those devices to maintain security.
- Monitor Account Activity: Keep a close eye on your account activity and consider enabling alerts for any suspicious or unauthorized activity. Regularly review the “Recent activity” section in your Google account settings to ensure there are no unfamiliar sign-ins or unusual activity.
- Manage Account Security Settings: Regularly review and manage your account security settings. Familiarize yourself with the available security features provided by Google, such as app permissions, recovery options, and account recovery information. Stay up-to-date with any recommended security updates and make the most of the security measures offered.
By following these guidelines, you can enhance the security of your Google account while using Google Passkeys and minimize the risk of unauthorized access or compromise.
Secure Your Digital Life With Google Passkeys
Indeed, remembering passwords has become an outdated and cumbersome method in the realm of authentication.
Thanks to the collective efforts of major companies, passwordless authentication is steadily becoming a reality, offering users the ability to log into apps and websites without the need for passcodes.
This new approach not only simplifies the login process but also provides enhanced security compared to traditional password-based logins.
The movement towards passwordless authentication is just beginning, and we can anticipate that in the future, the majority of apps and websites will adopt this trend, aiming to provide the best user experience possible.
As this transition unfolds, users can look forward to a more seamless and secure authentication process across various online platforms.
We hope that this guide has been beneficial to you in understanding the concept of passwordless authentication, specifically in the context of Google Passkeys.
If you encounter any difficulties while creating Google Passkeys or signing in using Passkeys, please feel free to share your experience in the comments section below.